
The woven-wood-and-linen pairing has owned the "natural window" category on Pinterest for about five years now, and most of the executions you find online are wrong in some specific way. Shade mounted at the wrong depth. Drape an inch short. Rod hung half a foot too low. Linen that turns out to be polyester in a clever weave. What follows is the actual sequence of decisions, in the order you should make them, so the finished layer reads architectural instead of flimsy.
1. Why this pairing earns the biophilic label
Biophilic design has a working definition out of the Terrapin Bright Green framework, which sorts the field into pattern categories including visual connection with nature, dynamic and diffuse light, and non-rhythmic sensory stimuli. Woven wood shades cover the second and third on their own. Their shadows shift across the day, no two of them are quite the same because each shade carries the natural variation you simply cannot get from synthetic materials, and the weave actually moves a little when a window is cracked open. The linen layer brings in the fourth element most rooms are missing: irregular fabric movement when air is circulating.
It’s also one of the few biophilic gestures that survives an unsentimental edit. Living plant walls are high-maintenance and expensive. Indoor water features mostly read dated. But woven woods are very natural and bring a certain earthiness, while linen is a very light material and softens the whole look with its gentle flow, and both materials are available at every price tier without a designer’s help.
Biophilic layered treatments work when both layers are actually plant fibers , bamboo, jute, reed, flax linen, cotton, hemp. The moment one of them becomes faux-linen polyester or PVC-coated “bamboo look,” the texture goes inert up close and the whole composition flattens. If your budget can only stretch to one real natural material, spend the money on the linen (it’s the surface you stand within touching distance of) and use a real-bamboo shade in the simplest matchstick weave.
2. Choosing the shade: weave, color, liner
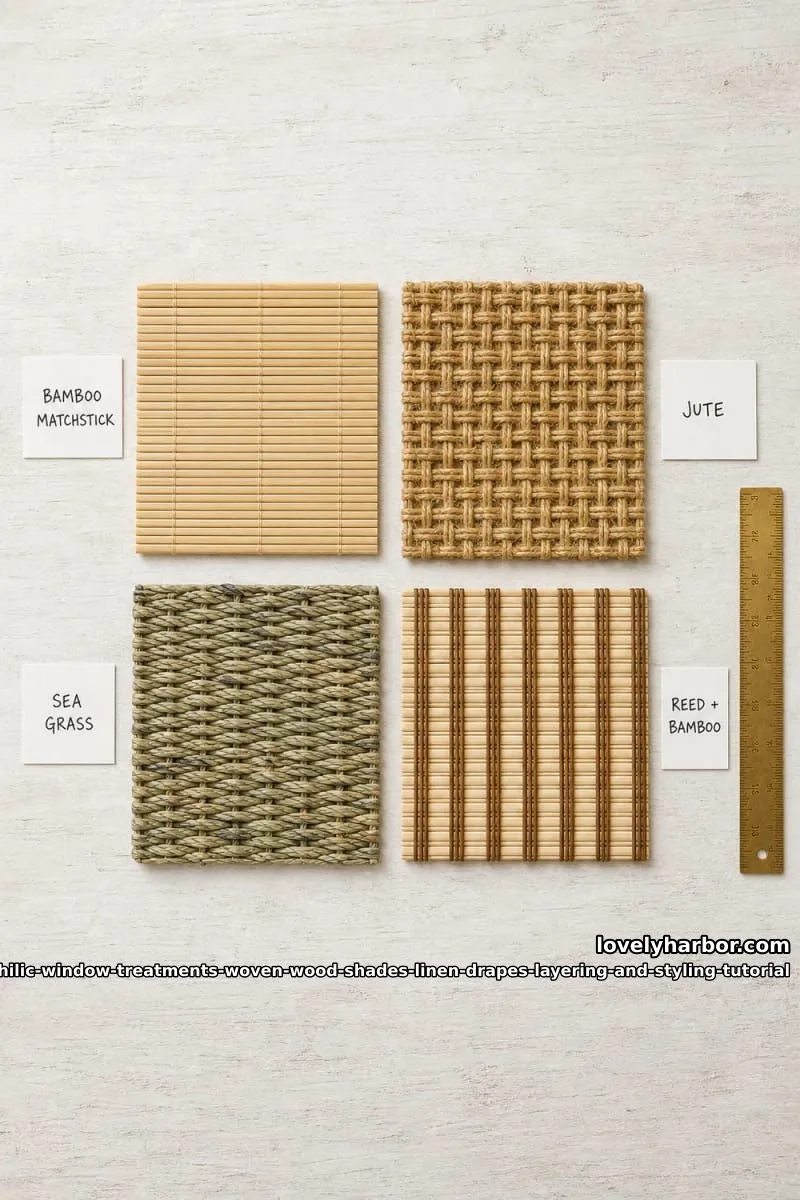
Most shoppers default to the palest possible matchstick bamboo because it photographs beautifully. It’s the wrong call in any room darker than a south-facing white box. Natural browns, tans, and honey tones complement the sand, driftwood, and ocean palette, sure , but drop that same pale shade into a north-facing room with cool gray walls and it suddenly looks yellow and a little cheap. Go a shade or two darker. Mid-tone reed-and-bamboo blends, the kind with vertical reed stripes running through, hold their own against gray walls in a way the pale stuff never will.
The other defining choice is the liner. Most reviews don’t bother to explain it, which is how people end up unhappy with shades that looked great in the catalog. Unlined woven wood is dimensional and lit-from-within and offers almost no privacy after dark. Choosing an unlined shade can offer ultimate natural light and texture to your space but keep in mind that unlined shades do not provide the same level of privacy as lined shades. Privacy liner is the right default for living rooms. Blackout liner belongs in bedrooms. Do not put a blackout liner in a living room shade hoping it’ll behave like a privacy liner. It changes the way light filters through the weave during the day, which kills the dappled effect that justified buying the shade in the first place.
Do this
- Privacy liner (sometimes labeled light-filtering) in living rooms, dining rooms, kitchens
- Blackout liner , bedrooms and nurseries
- Always order swatches. Bamboo color varies dramatically batch to batch and you cannot tell from a screen.
- Inside-mount if your window has at least 1¾” of depth
Avoid
- Blackout liners in main living spaces , they kill the dappled-light effect that justified the shade
- Faux bamboo PVC shades. They read plastic.
- Pale matchstick in north-facing or gray-walled rooms
- Outside-mounting when inside-mount would fit. The outside mount stacks fabric in front of the drape line and the whole layered geometry collapses.
A cordless woven wood shade you can size to actual window dimensions, with a privacy liner option built in — the spec most off-the-shelf shades skip.

3. Choosing the linen: weight, fiber, header
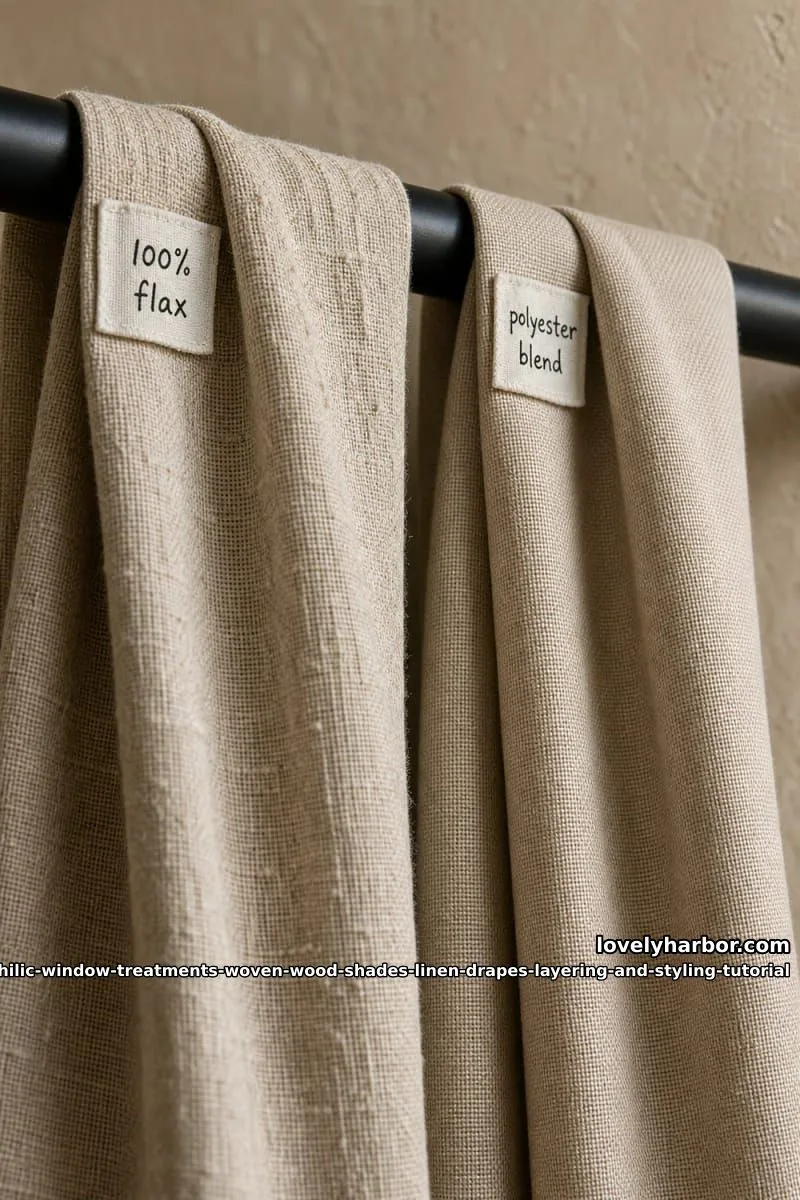
The single biggest variable separating expensive-looking from cheap-looking is what the drape is actually made of. The market is flooded with “linen-look” and “faux linen” panels that are 100% polyester. They photograph fine. They feel acceptable when you pull them out of the package. Then about six months in, after some sun, they develop a slick, slightly plasticky sheen that nothing else has. Real linen wrinkles. With 100% pure linen, wrinkles are unavoidable as they are one of the best and oldest fibres when weaving linen due to the low elasticity of the flax plant fibres. If a panel is sold as “wrinkle-free linen,” it’s polyester. I’d bet money on it.
For the biophilic look, 100% European flax linen is the right call. Linen-cotton blends are fine. Anything advertised as "30% linen, 70% polyester" is not the same product. Real linen costs more , a 52" x 96" panel typically runs $50 to $90 each , but you're buying two panels per window in most cases, not eight. The math is bearable.
European flax linen in unlined rod-pocket construction, with a 3″ pocket and 4″ hem that lets you swap rods without rebuilding the panel.
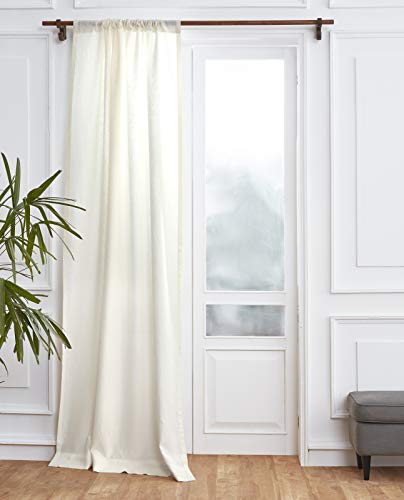
On color: the failure mode is chasing pure white. It photographs beautifully against a wall that's exactly the same white, but in a room with any warmth in the floor or trim it reads cold and clinical. Default to ivory, oatmeal, light natural, or champagne beige. If you want depth, go all the way , chambray blue or a soft sage. Skip greige. It ages oddly when the linen relaxes.
Header style matters less than people make it out to matter. The working hierarchy: pinch pleat looks tailored and reads more formal, grommets look contemporary but the metal rings tend to fight the rest of the natural-fiber palette, rod pocket is the most casual and the most forgiving on price. Pinch Pleat: Fabric is gathered into structured pleats and attached to the rod with drapery rings. For most living rooms, rod pocket or back tab is correct. Grommets only if you’re willing to spend on genuinely good rings.
4. Hardware and rod placement
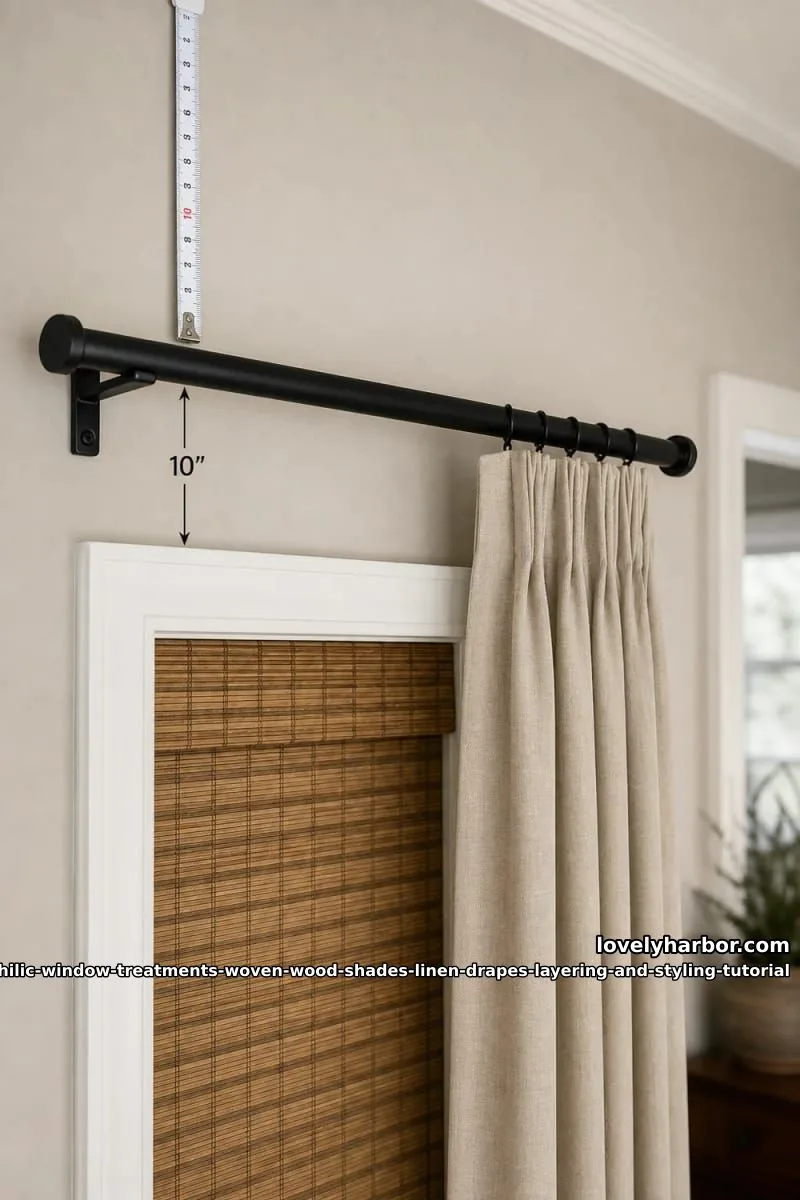
This is the section that, if you do it right, the rest of the article matters. If you do it wrong, nothing downstream rescues you. Two numbers matter more than any other decision: how far above the window frame the rod sits, and how far past the frame it extends on each side.
Rod height above frame:Hang rods 6 to 12 inches above the window frame to add height.If your ceiling is 9 feet or taller, push to 10 to 12 inches. With an 8-foot ceiling, 6 to 8 inches is the ceiling on the ceiling, so to speak. The closer you can get to actual ceiling without crowding the crown molding, the taller the window reads.
Rod extension beyond frame:Extend rods 4 to 6 inches beyond each side of the frame to let curtains fully open without blocking light.On wider windows, or where two drapes need real stack space, go to 8 inches per side. This is the dimension that lets the drape clear the glass when open, which is the entire reason you bought a layered system instead of a single shade.
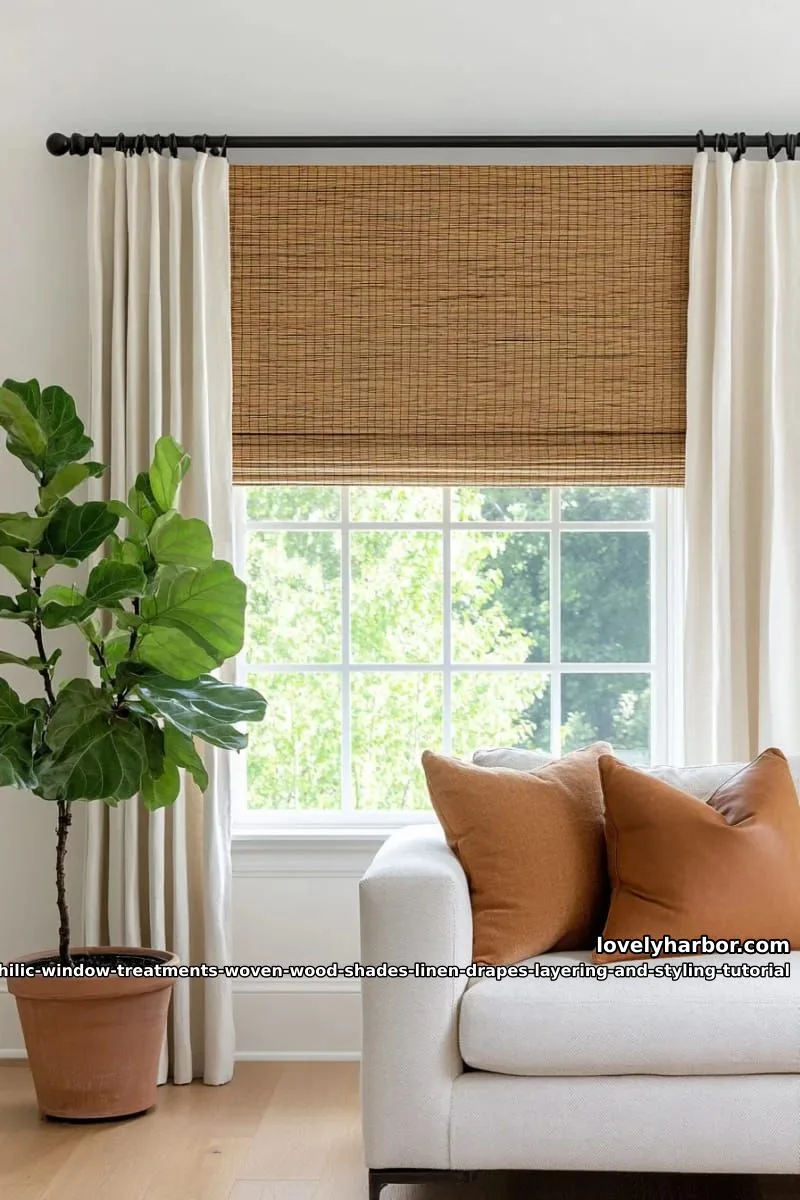
Inside-mount the shade, outside-mount the drapery. That’s the architectural rule and there isn’t really a second one. Fit the shade in the window frame. Next, place a curtain rod outside the frame, mounting it high and wide. This is definitely the neatest way to layer for a window that has both shade and drapes. The shade is nicely hidden within the window, while the drapes frame it elegantly, making the window look not only taller but also more spacious. If your window depth is under 1¾ inches you’ll have to outside-mount the shade, and you’ll lose the clean frame-within-a-frame look. There’s no way around it.
On finish: matte black is the safe biophilic default because it disappears against most wall colors. Brushed brass works if you have other unlacquered brass elsewhere in the room , drawer pulls, a faucet, picture lights. Polished chrome and oil-rubbed bronze both fight the natural-fiber palette and should be avoided. Pick one finish for the whole room and live with it.
A wrap-around 1-inch rod in matte black that extends from 72 to 144 inches and actually holds drapery weight — not one of the thin tension rods most people end up with.

5. The layering sequence, in order
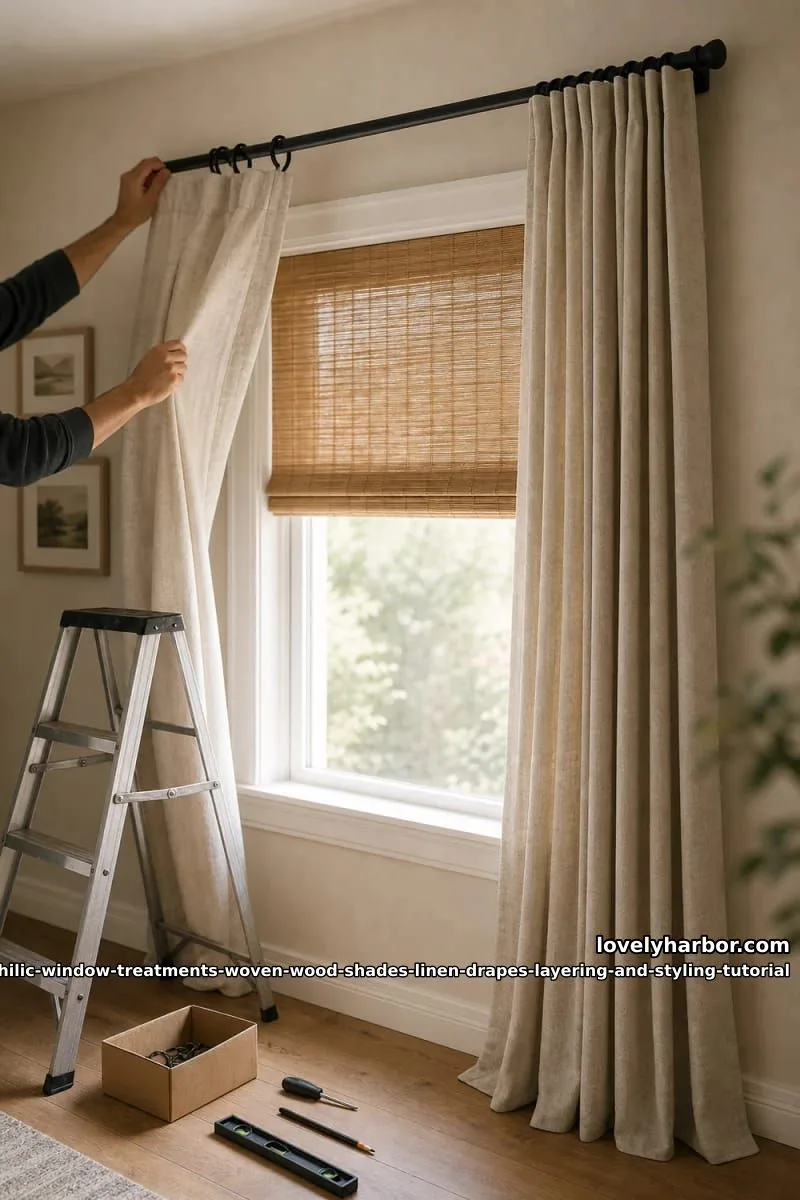
Order matters because each step locks in a dimension for the next.
- Measure the inside of the window frame to ⅛ inch. That’s your shade width. Most fabricators take a ⅜ inch deduction; verify yours does, because if you also deduct, the shade arrives too narrow.
- Order the shade and wait for it. Don’t pick a linen color before the actual shade is in hand. Bamboo color varies enough between batches that you have to hold the real shade against linen samples in your room’s actual light.
- Mount the shade inside the frame. Use the bracket positions the manufacturer specifies , most need a 1¾ inch minimum depth. Test the cordless lift or motor before driving the screws all the way home.
- Now mark the rod position. Halfway between the top of the casing and the ceiling, or 10 inches above the frame, whichever is less. Mark both bracket positions with a level. Extend marks 4 to 8 inches beyond the frame on each side, based on the stack-back space you actually need.
- Brackets go into studs or into appropriate drywall anchors. A 96-inch linen panel weighs three to four pounds; two panels plus the rod is comfortably over 10. Plastic anchors will pull straight out of the wall in about a year.
- Hem the drape only after the rod is up. Measure from the bottom of the rod (or the bottom of the ring, if you’re using rings) to ½ inch above the floor. Order the panels long, then adjust.
The hem-after-hanging rule sounds obvious and gets ignored constantly. The outer curtain must be as long as, or slightly longer than, the inner layer. If the outer drape shrinks even an inch, the whole layered look collapses, the inner shade or sheer peeks out awkwardly, and the proportions feel off. Hem the panels while they’re hanging on the rings in their final position. Not before.
6. Length archetypes: kiss, break, puddle
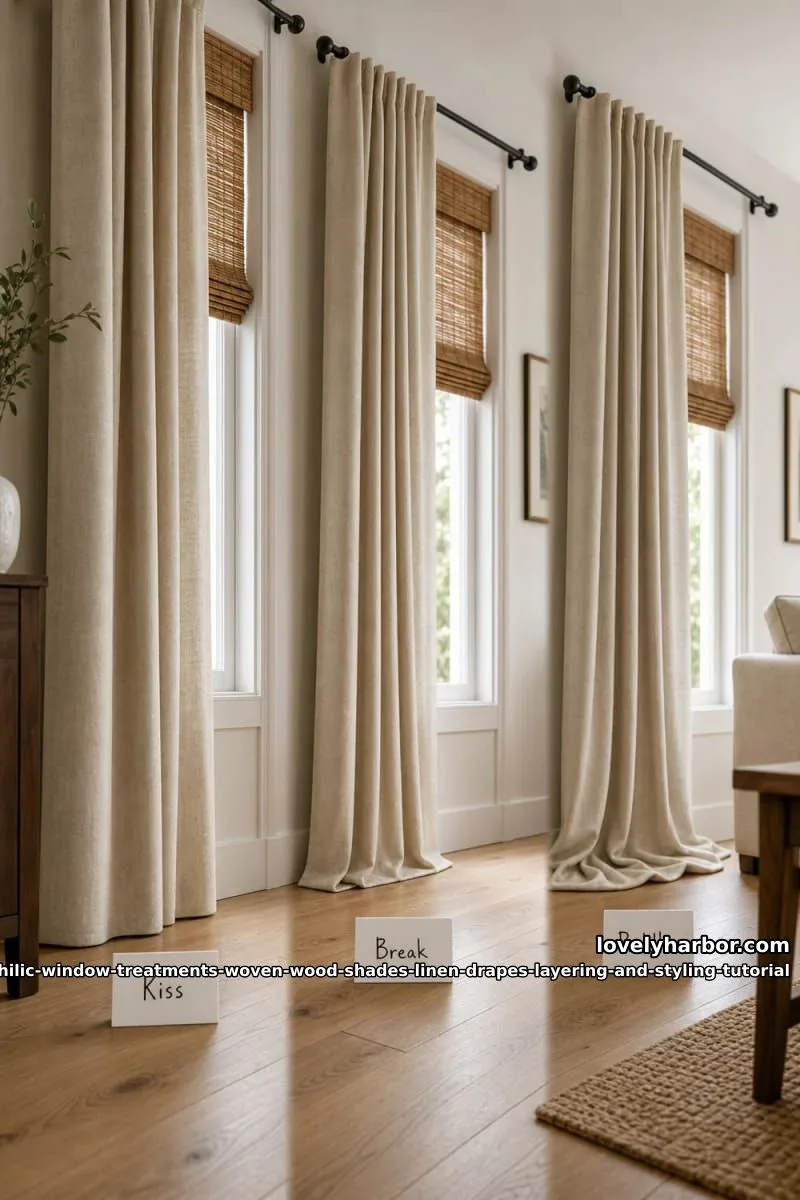
Drapery length is partly a style choice and partly a maintenance one. Three working positions: kiss, break, puddle. Get this wrong and you'll undo the whole linen-and-bamboo elegance faster than a bad color.
Drape ends ¼ to ½ inch above the floor
The cleanest option. The drape just clears the floor when stationary and never drags. Right call for high-traffic rooms, families with cats, anyone running a robot vacuum. It demands precise hemming , a ½ inch error is visible.
Drape pools 1 to 2 inches on the floor
The default for the layered biophilic look. The slight break softens the vertical line and reads relaxed without reading sloppy. It also forgives ½ inch of measurement error, which is the real reason most people land here.
Drape pools 4 to 8 inches on the floor
Period-formal. In a real 19th-century house with 11-foot ceilings and original moldings, a puddle is correct. In a 2010s new build, it reads as costume. Skip in any room with pets or kids , puddled linen attracts hair and dust at a pace you’d have to see to believe.
Drape ends 2 or more inches above the floor
Not an option. A drape ending above the floor looks like it was hemmed for a different window. Café curtains at sill height are the only exception, and café curtains don’t layer with woven wood anyway.
7. Light, privacy, and the circadian argument
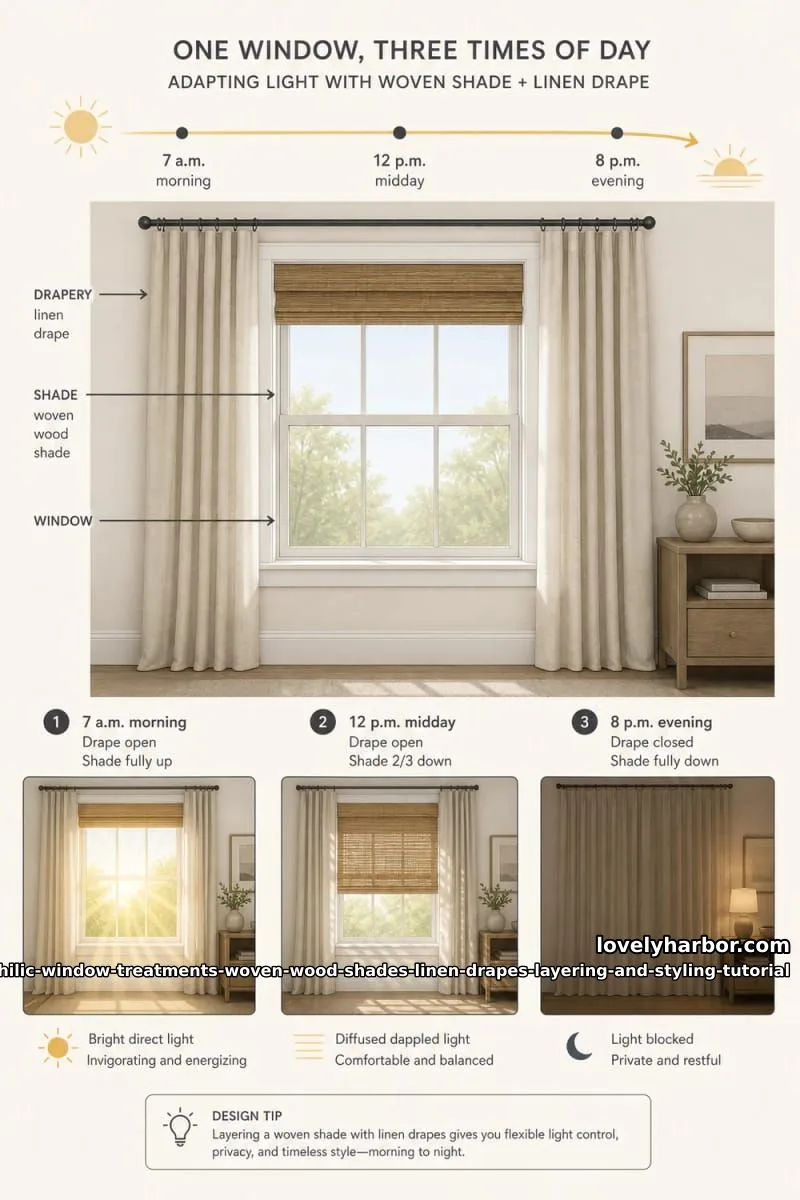
An underrated reason to layer at all: independent control of two layers across the day. Morning light signals to your body when to wake up. Evening dimness tells it when to wind down. Window treatments that honor that cycle make a genuine difference in how you sleep and how you feel throughout the day.
Working pattern: shade up and drapes open in the morning, shade pulled two-thirds down by late morning to cut screen glare, drape closed at dusk for privacy and a little thermal insulation. In bedrooms, the blackout-lined shade is the actual workhorse at night; the drape is a secondary insulator and the aesthetic layer that hides the shade hardware.
Window treatment companies love to upsell blackout liners on every shade in the house “for flexibility.” Don’t do it.Heavy blackout treatments in every room can quietly disrupt your circadian rhythm.The point of the layered system is that daytime light filters through the woven wood. Blackout liners eliminate that. Reserve blackout for bedrooms.
8. Room-by-room adaptations
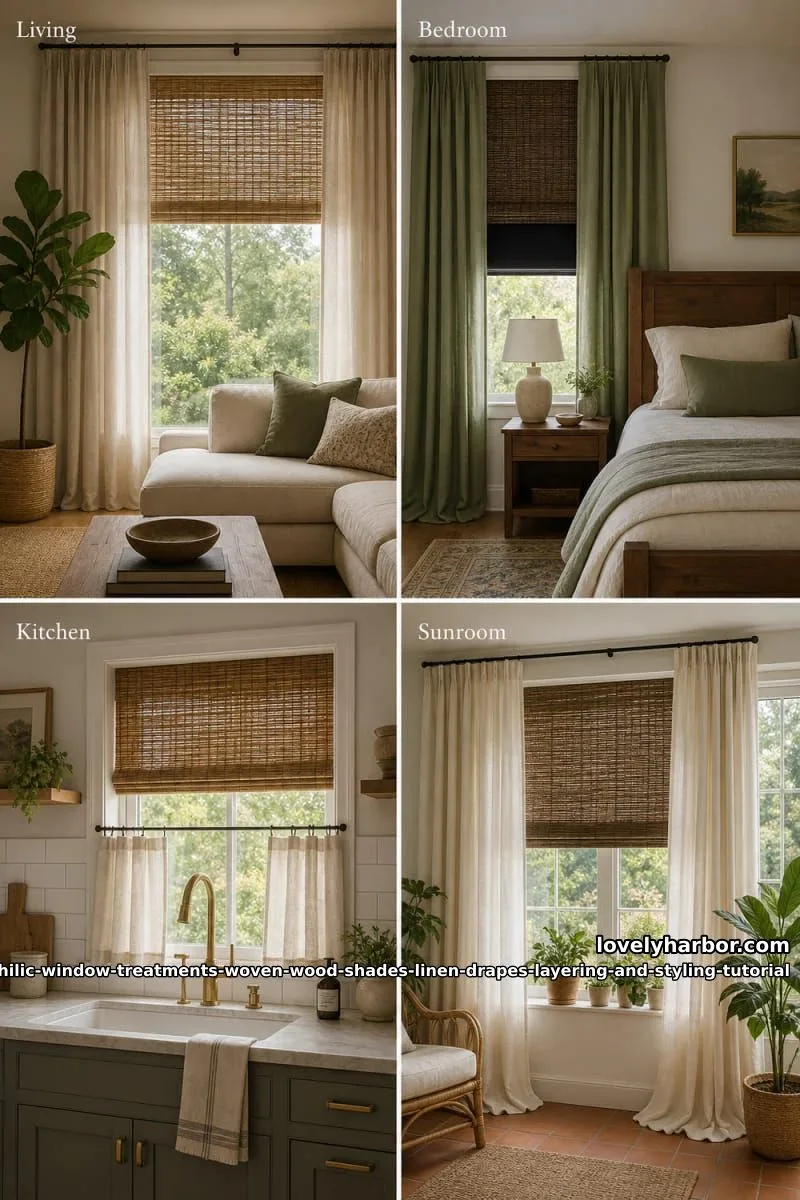
The base system stays the same in every room. What changes is the liner, the linen color, sometimes the length.
| Room | Shade liner | Linen color | Length | Notes |
|---|---|---|---|---|
| Living room | Privacy (light-filtering) | Oatmeal, ivory, or champagne | Break | Default configuration. Maximum dappled light during the day. |
| Primary bedroom | Blackout | Sage, mushroom, or chambray | Break or kiss | Darker linen pairs better with the blackout backing showing at night. |
| Kitchen | Privacy | Ivory or white | Café (sill) or kiss | Real linen handles kitchen humidity better than blends do. |
| Sunroom | None (unlined) | Light natural | Kiss | UV protection comes from the weave; skip blackout. |
| Dining room | Privacy | Forest green or navy | Puddle | The one room where a small puddle reads correct, especially with vintage furniture. |
| Home office | Privacy | Charcoal or oyster grey | Kiss | Skip the drape entirely if the shade is your main glare control on a screen-facing wall. |
The kitchen call is the one readers push back on. Cotton sounds more sensible near a stove, polyester sounds like the obvious “easy clean” option. Real linen is genuinely fine in kitchens , it washes well at low temperatures, and Pure Linen mellows with each washing, betters with age and requires minimal care. The thing you actually shouldn’t put in a kitchen is unlined sheer linen at café length over a gas range. That’s a fire concern, not a styling one.
9. Mistakes that flatten the layered look
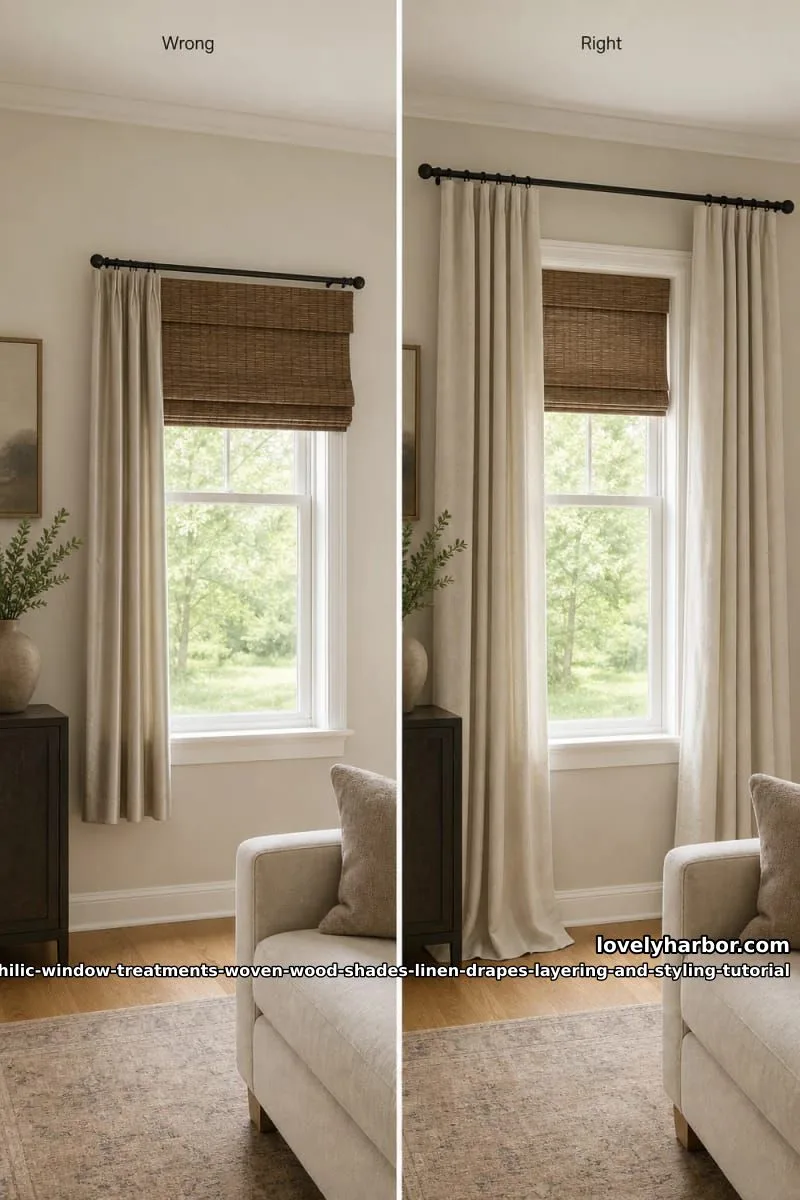
The list of small errors that ruin this look is short. The variations on those errors are endless. Five worst offenders:
- Rod hung at the top of the window frame. The drape now visually shortens the window. This is the single most common error in American home photos and once you start noticing it you can’t stop.
- Drape ending 2 to 4 inches above the floor. The window reads incomplete. Hem panels long, even if you have to take them up later. Never cut linen short.
- Outside-mounted shade behind the drape. The shade projects an inch or two into the room from the wall, and the drape can’t sit flat against the wall when closed. Inside-mount whenever the depth allows.
- Matchy hardware mixed across the room. Brass curtain rod, chrome doorknob, oil-rubbed-bronze light switch. Pick one.
- Faux linen pretending to be linen. The polyester sheen comes out under any direct sun, the panels feel heavier than real linen but stiffer in the hand, and you’ll know the moment you touch them. Order swatches.
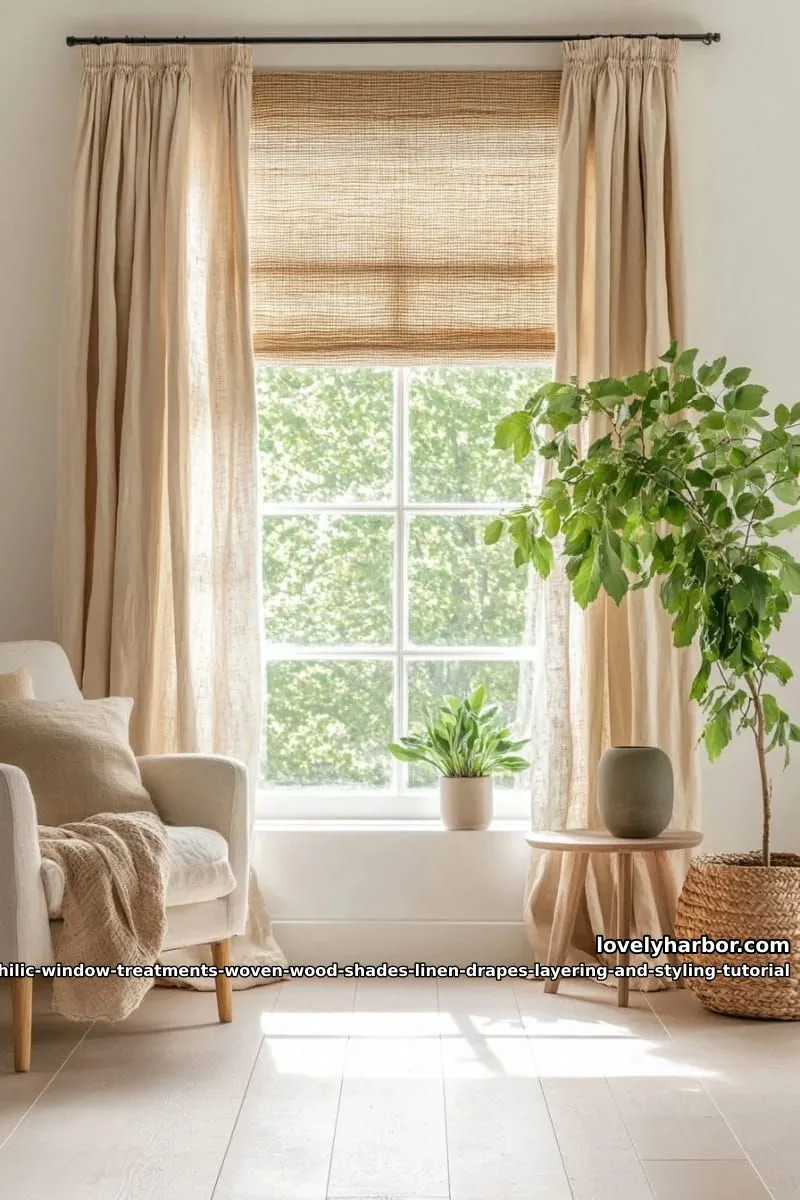
One more, because it took me two installations to learn: stack-back. If your drape is 52 inches wide and your window is 36 inches wide, you need at least 12 inches of wall on each side beyond the casing for the drape to fully clear the glass when pulled open. That's why the 6-to-8-inch rod extension matters. Without the wall space, the drape ends up half over the window all the time, and the bamboo behind it never gets a clear sightline to the room. The layered effect dies.
Conclusion
If you only take one number out of this tutorial, take the rod height. Ten inches above the frame, six inches past each side. A real bamboo shade and a real linen drape will still look bad if the rod is sitting two inches above the casing. The same shade and drape, mounted correctly, will look expensive at the lower price tiers.
One thing I didn't say earlier: do this in summer if you can. Linen relaxes and lengthens in humid air, and a panel you hem in February will read a hair short by August. Hang the panels for a week before you commit to a hem.