
The usual order is backwards. People fall for a plan first — the rendering with the golden-hour sky, the wraparound porch, the dog that does not come with the download — and then try to wedge that plan onto whatever ground they own. That is how you end up paying to flip a garage, re-engineer a foundation, or discover that the great room's wall of glass faces the neighbor's chain-link fence.
Your lot has already written most of the plan's constraints before you have picked a single room: its width caps the house's width, its setbacks carve out where anything can sit, and its slope quietly sets your foundation budget.
Read the land first, in that order, with actual measurements. Below is what to check and the math that decides whether a plan fits at all.
Start with the land, not the rendering
Pull your plat and, ideally, a recent survey before you shortlist a single plan. The plat gives you lot lines and dimensions; a boundary and topographic survey adds the contours, the easements, the spot elevations, and where the utilities actually enter. Designers lean on that base for a reason. A residential topographic survey is what lets anyone set floor elevations, foundation exposure, driveway approach, and drainage routes, and without it a plan can be correct on paper and wrong on the ground, as the folks at RW Lynch put it in their lot-first breakdown. A mortgage location drawing does not count; it satisfies a lender without mapping the dirt accurately enough to design on.
The reason this sequencing matters is money. Every change you make to a plan after you own it — flipping it, widening it, swapping a slab for a walkout — costs more than choosing a plan that already suited the site. Archival Designs frames the whole thing as a chicken-and-egg question and lands where most honest builders do: on a suburban or urban lot, verify the land's rules first, then pick the house. Rural acreage is the forgiving case, where you have room to indulge a style and still clear the setbacks. A tight infill lot is not.
Your buildable envelope decides the footprint
The buildable envelope is the box left over after you subtract every no-build strip from the lot, and it is smaller than people expect. Start with total lot area, then remove the front, side, and rear setbacks, then remove any utility or drainage easements, then remove whatever a floodplain or slope buffer takes. Setbacks vary wildly by jurisdiction, but a common suburban pattern runs somewhere around 20 to 30 feet in front, 15 to 25 feet at the rear, and 5 to 10 feet per side. On a standard suburban parcel that alone can eat 20 to 35 percent of the lot before you have drawn a wall. Corner lots are worse: they often carry two front setbacks instead of one, which can strip another 15 to 20 percent off the envelope compared to an interior lot.
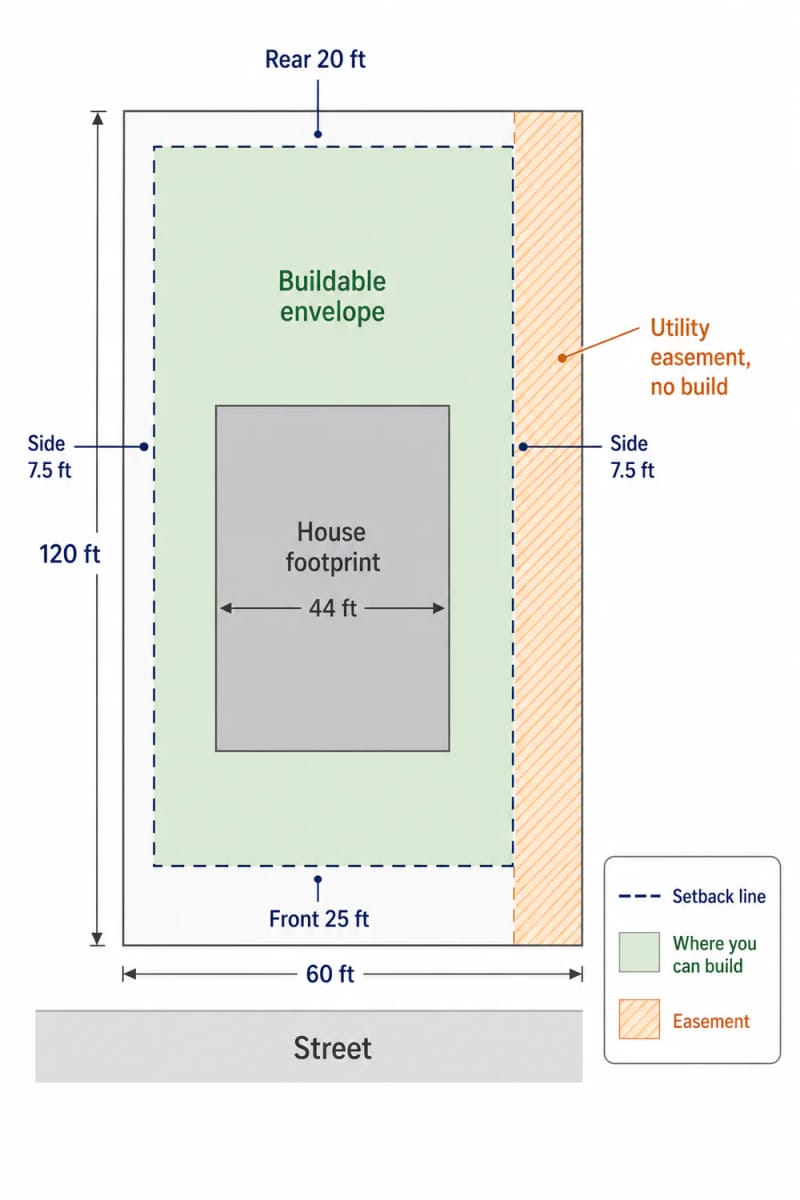
Two numbers get conflated constantly and they are not the same thing. Your envelope is where you can build; your lot coverage limit is how much of the lot you are allowed to cover, usually somewhere in the 25 to 40 percent range for single-family zones, counting the house, the garage, and often the driveway and other hard surfaces. Floor-area ratio is a third cap on total square footage across all floors. A big lot does not guarantee a big house, because coverage and easements shrink the useful part while the acreage number stays flattering. The single most useful check you can run before falling for anything is the width math: take your lot width, subtract both side setbacks, and compare what is left to the plan’s overall width measured to the outside of the walls — not the marketing footprint, and remember the eaves project past the walls. If the plan is 44 feet wide and your buildable width is 45, you do not have a house, you have a lawsuit with the side-yard.
Run your own numbers here before you get attached to anything:
Will this plan fit your lot?
Rectangular-lot estimate. All values in feet. Measure the plan to the outside of its walls.
Enter your numbers above.
A planning estimate only, not a zoning determination. It assumes a rectangular lot and equal side setbacks, and ignores easements, corner-lot double frontage, and eave projections. Confirm every figure with your local planning department and a surveyed site plan before you buy a plan.
Orientation is the upgrade people skip
Which way the house faces is the closest thing to a free performance upgrade in the whole exercise, and it is the first thing sacrificed to convenience. In most of the country a south-facing rear elevation collects the most sun across the day, which is what you want behind the kitchen, the great room, and any pool or covered lanai. East-facing rear rooms get soft morning light; a west-facing rear gives you sunsets and a late-day heat load that wants deeper porch overhangs or real shading, not blinds bought afterward.
The mistake is treating the plan's paper orientation as fixed. Plan elevations are labeled front, rear, left, and right for the drawing, not for the compass — how the plan meets north on your specific lot is your decision to make, and the plan set even notes that finished grade and siting are set for the actual site.
When the good light, the view, or the driveway approach all sit on the wrong side of the plan as drawn, the fix is a right-reading reverse: the whole layout mirrored left-to-right, with the text and dimensions corrected so it stays readable, which is what keeps your builder and the building department able to use it. It is cheap relative to what it buys. One seller, Rocky Mountain Plan Company, lists a right-reading reverse at $250 and about three to four business days, and it changes nothing about the square footage or room count, only the handedness. Before you assume a reverse solves it, though, it is worth understanding what a plan set actually includes when you buy it online, because a mirror flips the whole package, kitchen plumbing wall and all.
Slope is where the money hides
Grade is the variable that quietly rewrites your budget, so read the slope's direction before anything else about the terrain. A front-to-back drop is the friendly one: it hands you a walkout or daylight basement almost for free, because the natural fall exposes a full lower wall and lets water run away from the foundation instead of into it. Side-to-side, or cross-slope, is the expensive one. It pushes the plan sideways along the contour and typically forces stepped footings, a narrower footprint, or piers and grade beams where cutting a full flat bench would haul off too much soil. An upslope lot off the road wants a higher entry and a tucked garage; a downslope lot puts the garage and entry near the street with the living space opening to the view below. A grade under roughly 10 percent — about a foot of drop over 10 feet — is the easy zone that most plans handle without drama.
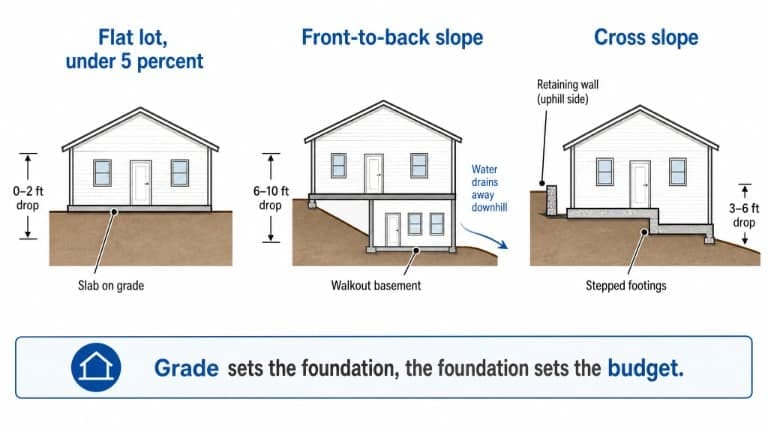
Your lot also narrows the foundation menu, and the plan has to match what the ground will accept. Slab-on-grade is the cheap default for flat, dry sites; a crawl space earns its keep on damp ground by keeping the plumbing reachable; a full or walkout basement is the natural answer on a slope and the way you buy back square footage the grade was going to cost you anyway; pier-and-beam or stilts belong in flood and coastal zones. Digging into a hill to force a flat pad for a slab-designed plan is how budgets quietly detonate, which is the whole argument for choosing a plan drawn for your slope type rather than fighting it. Whatever you cut and fill, the leftover grade becomes yard you still have to live with.

Access, grading, and where the water goes

The garage and its driveway drive more plan decisions than their glamour warrants. A front-load garage needs room to turn a car around, and builders generally want something like 25 to 30 feet between the garage face and the property line for it to work, which on a shallow lot can push the whole house back or force a side-entry garage the plan may not offer. Steep street access makes it sharper still: a driveway that meets the road or the garage too abruptly scrapes bumpers and funnels runoff toward the house, so a big grade change can push you toward a lower-level garage, a side entry, a switchback drive, or simply a narrower footprint than you wanted.
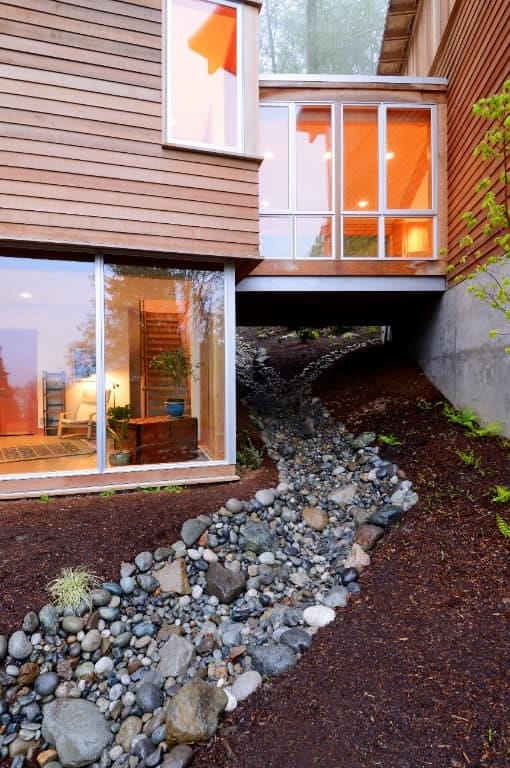
Then there is the height the house sits at, which the plan leaves open on purpose. Stock elevations are usually drawn with the ground plane a foot or so below the top of the foundation, with finished grade left to the contractor for the actual site, so the number of steps up to your front door is a siting choice, not a fixed feature. Fewer steps reads as a lower, more grounded profile from the street; a lot that sits up on a knoll may give you no choice but a long stair. What is not negotiable is water: the finished grade has to fall away from the house on every side, and a plan that assumes a walkout on ground that does not drop will trap water against a wall you paid to waterproof.
When a plan almost fits your lot
Most plans do not fit perfectly, and the useful skill is knowing which gap is worth closing. A reverse is trivial. Widening a bay, changing a foundation type, or nudging a wall to clear a setback is real engineering, and once you are enlarging the footprint, altering roof pitches, or moving structural walls you are paying a designer to redraw, which is roughly where the savings of a stock plan start to evaporate. This is the point to be honest about when a stock plan stops being the cheaper path and a designer is the straight answer, especially if your lot is the unusual one that generated three modifications before you even reached the kitchen.
Modifications are also where the sticker price and the real price separate, so cost the changes before you commit, not after. A permit-ready reverse is a couple hundred dollars; a foundation swap, an engineer’s stamp for a wind or flood zone, and a widened footprint are a different order of number, and they belong in the budget beside the plan itself, which is the gap covered in what house plans really cost once the modifications land.
Do this
- Draw your buildable box from the plat and survey before you shortlist a single plan.
- Match the plan’s overall width — walls plus eave overhang — to your buildable width, not to your lot width.
- Price the foundation change and the reverse into the budget before you buy.
Avoid
- Buying off the rendering and its golden-hour landscaping (none of which ships with the plan set).
- Assuming acreage equals a big house; coverage caps and easements quietly shrink it.
- Counting on a setback variance. Boards want a genuine hardship, and they say no far more than yes.
If a plan clears your width, sits right for the sun, and matches your slope type without a foundation fight, that is the one to modify. Everything else on your shortlist is asking you to pay to fake a lot you do not have.
Related Posts
- Buying House Plans Online: What You Actually Get
- Stock House Plans vs Custom Architect: Which Is Right for Your Build
- Mexican Patio Design Guide: 5 Yard Layouts & 3 Floor Plans
- 44 New Farmhouse Exterior Designs To Copy
- 25 Stunning Small Garden Layout Ideas
- How to Transition Farmhouse to Modern Coastal Without Gutting the House